Tag Archives: Beauty Tips

šŸ”„ Get the Perfect Curl with Heated Eyelash Curlers! šŸ”„

Standard

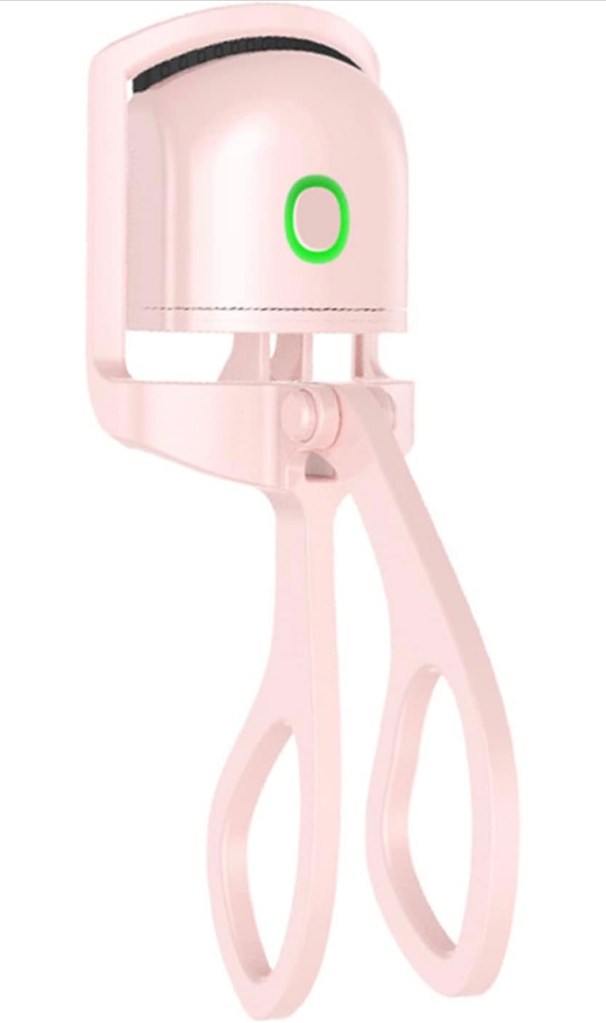
Tired of traditional eyelash curlers that just donā€™t give your lashes that long-lasting, dramatic curl you desire? Say goodbye to those struggles and hello to the world of Heated Eyelash Curlers! Whether you call them Heated Lash Curlers, Electric Eyelash Curlers, Rechargeable Eyelash Curlers, or Handheld Heated Curlers, these innovative beauty tools are taking your lash game to the next level.

āœØ Why Heated Eyelash Curlers?

Traditional eyelash curlers can be a bit intimidating, and they donā€™t always provide the best results. Thatā€™s where heated options come into play. They offer several benefits:

1. Effortless Curling: Heated eyelash curlers are designed to gently curl your lashes with heat, eliminating the need for excessive pressure and reducing the risk of lash damage.

2. Long-Lasting Curls: The heat helps set the curl, ensuring your lashes stay beautifully lifted throughout the day.

3. Precision Control: These curlers come in various designs, including handheld and electric models, allowing you to target specific sections of your lashes for a customized look.

4. Rechargeable Convenience: Many models are rechargeable, saving you money on disposable batteries and reducing environmental waste.

5. Enhanced Safety: Modern heated lash curlers are designed with safety in mind, with features like temperature control and auto shut-off to prevent overheating.

āœØ How to Use a Heated Eyelash Curler:

Using a heated eyelash curler is easier than you might think:

1. Prep Your Lashes: Start with clean, dry eyelashes. You can apply mascara before or after curling, depending on your preference.

2. Power Up: Turn on your heated eyelash curler and wait for it to reach the desired temperature. Most models have indicator lights to let you know when theyā€™re ready.

3. Curl Carefully: Gently place the heated curler against your lashes, starting at the base and moving towards the tips. Hold for a few seconds, being careful not to touch the skin.

4. Repeat if Necessary: Depending on your lash length and the effect you want, you may need to curl in sections.

5. Finish with Mascara: Apply mascara to seal the curl and enhance your look.

āœØ Popular Brands and Models:

There are various brands and models of heated eyelash curlers to choose from, including Ardell, Panasonic, Chella, and more. Whether you prefer a compact handheld version or a rechargeable electric curler, thereā€™s a perfect option for you. I will have a video on Tik Tok and the one I use available there.

https://amzn.to/46Qswu4

In conclusion, if youā€™ve been struggling to achieve that perfect lash curl, a heated eyelash curler could be your new beauty best friend. Say goodbye to pinching and hello to effortless, long-lasting curls. So, which type of heated eyelash curler are you excited to try? Let us know in the comments below! šŸ”„šŸ’ā€ā™€ļø

Disclaimer: Please exercise caution and follow the manufacturerā€™s instructions when using heated eyelash curlers. These devices utilize heat, which can potentially cause harm if not used properly.

Heated Eyelash Curler

The Beauty Secret in a Nutshell: Benefits of Coconut Oil as a Face Moisturizer

Standard

Hi beautiful people!

Coconut oil isnā€™t just for cooking anymore; it has made its way into the beauty world as a natural and effective face moisturizer. This tropical gem, extracted from the flesh of coconuts, has gained immense popularity for its numerous skin-loving benefits. Here are some of the compelling reasons to consider using coconut oil as your go-to face moisturizer:

1. Deep Hydration: Coconut oil is a potent moisturizer that deeply penetrates the skin, providing intense hydration. Itā€™s an excellent choice for those with dry or dehydrated skin, helping to lock in moisture and prevent water loss.

2. Natural Emollient: The natural fatty acids in coconut oil make it an ideal emollient, softening and smoothing the skin. Regular use can leave your skin feeling silky and supple.

3. Anti-Aging Properties: Coconut oil is rich in antioxidants, which can help combat the signs of aging. It may reduce the appearance of fine lines and wrinkles, keeping your skin youthful and radiant.

4. Acne-Fighting: Surprisingly, coconut oil can be beneficial for acne-prone skin. Its antibacterial and anti-inflammatory properties can help prevent and treat breakouts. Just be sure to use it sparingly if you have oily skin.

5. Natural Barrier: Coconut oil acts as a natural barrier, protecting your skin from environmental pollutants and UV radiation. Itā€™s a great way to shield your skin from harmful elements.

6. Gentle Makeup Remover: Coconut oil doubles as an effective makeup remover. It can easily dissolve even the most stubborn waterproof makeup while being gentle on your skin.

7. Versatility: Not only can you use coconut oil as a face moisturizer, but it can also be applied to other parts of your body and even your hair. Itā€™s a multi-purpose beauty essential.

8. Cost-Effective: Coconut oil is readily available and cost-effective compared to many commercial moisturizers, which often contain added chemicals and fillers.

9. Hypoallergenic: For those with sensitive skin, coconut oil is often well-tolerated due to its hypoallergenic properties. Itā€™s less likely to cause allergic reactions.

10. DIY Beauty: Coconut oil can be easily incorporated into your DIY beauty routines. From face masks to body scrubs, it can be the star ingredient in various homemade skincare products.

There are many out there to choose from and any of them can be used. My go to coconut oil can be found here.

https://amzn.to/46z7eRH

While coconut oil has many benefits, itā€™s essential to use it in moderation. What works for one person may not work for another due to differences in skin types. Patch testing is always a good practice to ensure you donā€™t have any adverse reactions.

In conclusion, coconut oil is a natural, versatile, and affordable choice for face moisturization. Itā€™s a beauty secret that has stood the test of time and continues to win hearts for its remarkable skincare benefits. Give it a try and discover the wonders of this tropical elixir for yourself! šŸ„„šŸ’†ā€ā™€ļø #CoconutOil #Skincare #NaturalBeauty

ā¤ļø Beauty Biting

Organic Coconut Oil

Fruit on the Counter or in the Fridge: The Great Debate

Standard

Hi beautiful people!

When it comes to storing fruits, we often find ourselves facing a common dilemma – should they be placed on the kitchen counter or tucked away in the fridge? The debate over the ideal storage location for various fruits has sparked discussions among food enthusiasts, nutrition experts, and homemakers. In this blog post, we will explore the pros and cons of both methods to help you make informed decisions about how to store your favorite fruits.

The Counter: A Place for Ripening

Many fruits can be left on the counter to ripen, where they benefit from room temperature and proper air circulation. Here are some fruits that thrive on the counter:

These are super cute to hang and store fruit https://geni.us/FFVTFr

1. Bananas: These yellow gems are best kept on the counter, allowing them to ripen naturally. If they become too ripe, you can transfer them to the fridge to extend their shelf life.

2. Tomatoes: Although technically a fruit, tomatoes are often stored on the counter. This helps them develop better flavor and texture compared to refrigeration, which can dull their taste.

3. Avocado: Placing avocados on the counter accelerates the ripening process, ensuring theyā€™re ready to eat when they turn soft to the touch.

The Fridge: Extended Freshness

For some fruits, the fridge is the optimal storage location, as it helps preserve their freshness and prevents spoilage. Here are a few fruits that benefit from refrigeration:

1. Berries: Strawberries, blueberries, and raspberries tend to mold quickly at room temperature. Storing them in the fridge can extend their shelf life.

2. Grapes: Grapes retain their crispness and freshness when stored in the fridge. They are perfect for a cool, refreshing snack.

3. Apples: While apples can be stored on the counter for a short time, they last longer when refrigerated, especially if you donā€™t plan to consume them within a week.

For storing fruit or vegetables in the fridge these are great https://geni.us/PlzFSR

The Exceptions: Mixed Storage

Some fruits are flexible and can be stored in either location, depending on your preferences:

1. Citrus fruits: Oranges, lemons, and limes can be stored on the counter or in the fridge. If you prefer a chilled citrus burst, refrigeration is the way to go.

2. Peaches and nectarines: These fruits can be ripened on the counter and transferred to the fridge once they reach your desired level of ripeness.

Conclusion: Finding the Right Balance

The ā€œcounter or fridgeā€ debate often boils down to personal preference and the intended use of the fruit. If you plan to eat them within a few days, leave them on the counter to fully ripen and develop flavor. For longer shelf life, refrigeration is your best bet. Keep in mind that certain fruits are best suited to mixed storage, allowing you to enjoy the best of both worlds.

Ultimately, the key to preserving the freshness and flavor of your fruits is knowing when to transfer them from the counter to the fridge. By striking the right balance between the two, you can savor the deliciousness of your favorite fruits at their best.

Here is some hanging fruit baskets https://geni.us/xi4zY

Love, Beauty Biting ā¤ļø

The Ultimate Guide to Using Facial Oils for Radiant Skin

Standard

Hi beautiful people,

In recent years, facial oils have gained popularity as an essential component of skincare routines. These natural elixirs offer a multitude of benefits, from hydrating dry skin to preventing premature aging. If youā€™re new to the world of facial oils, or if youā€™re looking to refine your skincare routine, this guide will walk you through the basics of using facial oils to achieve radiant, healthy skin.

Why Use Facial Oils?

Facial oils have been used for centuries in various cultures for their skincare benefits. Today, they are making a resurgence due to their versatility and effectiveness. Hereā€™s why you should consider incorporating facial oils into your regimen: Click this link on where i buy some of the best facial oils. https://geni.us/BEGv6rO

1. Hydration: Facial oils are excellent moisturizers. They lock in moisture, keeping your skin plump and well-hydrated.

2. Skin Barrier Support: They strengthen the skinā€™s natural barrier, protecting it from environmental stressors, pollution, and free radicals.

3. Anti-Aging Properties: Many facial oils are packed with antioxidants and vitamins that combat signs of aging, such as fine lines and wrinkles.

4. Balance for Oily Skin: Contrary to popular belief, facial oils can actually help balance oily skin by regulating sebum production.

5. Improved Complexion: Oils can improve the texture and tone of your skin, leaving you with a radiant complexion.

How to Choose the Right Facial Oil

Selecting the right facial oil is crucial for achieving your skincare goals. Here are some factors to consider:

1. Skin Type: Different oils work better for different skin types. For dry skin, opt for heavier oils like argan or avocado. Oily skin benefits from lighter oils like jojoba or squalane.

2. Ingredients: Look for oils rich in beneficial compounds such as antioxidants (e.g., vitamin E), fatty acids (e.g., omega-3), and essential oils (e.g., lavender or tea tree).

3. Allergies: If you have allergies or sensitivities, perform a patch test to ensure the oil doesnā€™t irritate your skin.

How to Incorporate Facial Oils into Your Routine

Now that youā€™ve chosen the perfect facial oil, hereā€™s how to incorporate it into your skincare routine:

1. Cleanse: Start with a clean face. Gently cleanse your skin to remove impurities and makeup.

2. Tone: Apply a toner to balance your skinā€™s pH levels. This primes your skin to better absorb the oil.

3. Moisturize: For an added boost of moisture, you can apply a light moisturizer before the oil.

4. Apply the Facial Oil: Place a few drops of oil onto your fingertips and warm it by rubbing your hands together. Gently pat and press the oil onto your face, neck, and dƩcolletage. Avoid rubbing vigorously, as this can cause friction and lead to irritation.

5. Massage: Take a moment to massage the oil into your skin, using upward and outward motions to promote circulation and absorption.

6. Sunscreen (Daytime): In the morning, always follow up with a broad-spectrum sunscreen to protect your skin from UV damage.

7. Sleep (Nighttime): If using facial oil in your nighttime routine, allow it to work its magic overnight. No need to follow with a moisturizer.

Tips for Success

Start slowly: If youā€™re new to facial oils, begin with a small amount and gradually increase as your skin becomes accustomed. ā€¢ Customize: Feel free to mix oils or layer them according to your needs. For instance, apply a nourishing oil at night and a lighter one during the day. ā€¢ Patience: Results may not be immediate, so be patient and consistent with your routine.

Try beauty bitings recommendation here https://geni.us/BEGv6rO for 20% off of my favorites!

Conclusion

Facial oils are a luxurious and effective addition to your skincare regimen. With the right choice of oil and a well-thought-out routine, you can achieve radiant, healthy skin. Remember that individual results may vary, so itā€™s essential to tailor your skincare routine to your specific needs and preferences. Embrace the world of facial oils, and let your natural beauty shine through.

Love Beauty Biting ā¤ļø

https://geni.us/BEGv6rO

How to Make Your Daily Greens Delicious: A Fresh Juice Recipe

Standard

Hi beautiful people,

Iā€™ve shared a TikTok video titled ā€œJuice With Me!ā€ You can find it here: https://geni.us/bay0O. In this post, Iā€™ll provide all the details you need.

Begin by selecting your preferred vegetables. Everyoneā€™s choices may vary due to allergies, so please adhere to allergy guidelines. Iā€™m not a doctor, so itā€™s essential to consult with your healthcare professional before making dietary changes. For me, this juice is a personal choice to incorporate daily greens and fruits. Be yourself! šŸ˜˜

Here are the ingredients I used today (though I often switch it up): 10 Basil leaves šŸŒæ, a generous piece of Ginger, a handful of Fresh Spinach, 2 Cucumbers šŸ„’, 2-3 Celery stalks, 3 Pineapple slices šŸ, 4 Apples šŸŽ, a generous amount of Parsley, 1 Lemon šŸ‹, and 1 Lime. Always wash and dry your produce and opt for Organic when possible. If not, use a cleaning solution. I personally use a mixture of baking soda and apple cider vinegar in a spray bottle. Spray the produce, let it sit for 5 minutes, rinse with hot and cold water, and pat it dry. You can find the best apple cider vinegar here: https://geni.us/h52SU.

Once your produce is clean, put all allowable ingredients into your juicer. I use this one: https://geni.us/AMZ4y, and donā€™t forget to apply the $10 off coupon at checkout. After juicing, add a tablespoon of Organic Olive Oil. You can find it here: https://geni.us/q9Zr9Z. And a dash of Cayenne Pepper. Mix thoroughly and store in an airtight glass bottle. These bottles work great: https://geni.us/i1pv. You now have your weekā€™s supply of daily greens.

Donā€™t forget to check out my TikTok video via the link in the first paragraph. Yes, I use affiliate links because Iā€™m sharing products I genuinely use and love with you, my readers. If youā€™re interested in these ideas or products, youā€™re helping support the knowledge and ideas I offer. Thatā€™s it! Stay Beautiful! ā¤ļø Beauty Biting

Daily Greens

Rediscovering Beauty: Embracing Naturals with Beauty Biting

Standard

Hi beautiful people!!!


Welcome back to Beauty Biting! Itā€™s been quite a journey since I began this blog, delving into the world of creativity and self-discovery. Life took me on a different path for a while, but now Iā€™m refocused and ready to share my passion for all things natural and beautiful.

Over the years, Iā€™ve immersed myself in the beauty sector, gaining a wealth of knowledge and experience. Itā€™s been a transformative journey, and Iā€™m thrilled to announce that Beauty Biting is making a comeback, stronger than ever. Weā€™re all about embracing natural alternatives and helping you connect with your authentic self.

My journey started back in 2005 when I began researching natural products, eventually leading to the creation of my own natural skincare company in 2007. Despite facing setbacks, I never gave up. Iā€™ve been constantly formulating, creating, and learning from past mistakes. You see, knowledge is something no one can take away from you.

This blog will serve as a platform for sharing recommendations of some of the finest natural products on the market, including my own creations. The trials, errors, and countless hours spent perfecting formulas have all paved the way. These products have been thoroughly tested and used.

But this blog wonā€™t just be about recommendations; it will be educational too. Iā€™ll be sharing videos on how some of these products are made, so you can explore your creativity and make them yourself. How exciting is that?

These natural products will change your perspective and make you feel like a million dollars. I promise, youā€™ll notice and feel the difference. If you try any of the products recommended here, we welcome your feedback. Honest feedback, including constructive criticism, is invaluable to us. Together, letā€™s stay true to our natural selves. ā¤ļøBeauty Biting!

A place to rediscover natural beauty
One-Time
Monthly
Yearly

Make a one-time donation to help support the continued creation of valuable content. To help raise money for prize giveaways.

Make a monthly donation

Make a yearly donation

Choose an amount

$5.00
$15.00
$50.00
$5.00
$15.00
$100.00
$5.00
$15.00
$100.00

Or enter a custom amount

$

Your contribution is appreciated.

Your contribution is appreciated.

Your contribution is appreciated.

DonateDonate monthlyDonate yearly